Cloudspaces
A Cloudspace is an isolated Virtual Network (Layer 2) where you can deploy cloud resources. This tutorial will explain Cloudspace features and basic functionalities.
Objectives
- Create a Cloudspace
- Edit a Cloudspace
- Manage Port Forwards in a Cloudspace
- Create anti-affinity groups
Before you begin
Before dealing with Cloudspaces, the user should know the three different types of Cloudspaces. These Cloudspaces differ in the types of networks they can connect to.
- Public Cloudspace: The Cloudspace's virtual firewall is connected to an external network, such as the Internet or your company network. Public does not necessarily mean connected to the Internet. Your operator provides the external networks of a location.
- Nested Cloudspace: The Cloudspace is connected to another cloudspace in the same location.
- Private Cloudspace: The Cloudspace is isolated with no connections.
Tip
For more information on Cloudspaces, see the Cloudspace section in Concepts.
Creating Cloudspaces
To create a Cloudspace
-
On the left side of the page in the navigation drawer, click Cloudspaces. The previously created Cloudspaces will be listed.
-
At the top of the page, click Create Cloudspace.
-
On the Select location step, choose the location where you want to deploy your Cloudspace from the available locations (the list shows each location's prices). Then click Next.
-
The wizard asks "How should your cloudspace be connected?" — select the connection type that matches the cloudspace you're building.
Select To an external network (internet, your company network, ...), then choose the external network from the drop-down list (one is preselected) and pick a firewall:
- Using the built in virtual firewall — supports port forwards, reverse proxy, load balancing, and connecting to remote cloudspaces out of the box.
- Using a custom virtual firewall that you choose and configure yourself — a custom virtual firewall where you configure the routing rules and virtual machine resources yourself.
- Select To another cloudspace in this location.
- Select the parent Cloudspace from the drop-down list.
Select Not connected.
-
Click Next. On the Add configuration details step, enter the basic configurations for your Cloudspace: Name, Subnet (a default such as
192.168.10.0/24is filled in), Subdomain (optional), Available top level domains and Local domain. Private cloudspaces only show Name, Subnet and Local domain.Tip
If you specified the subdomain when creating your public cloudspace, this subdomain will point to an external IP address of this cloudspace using an A-record.
Tip
A-record is a DNS record type. To learn more about DNS in whitesky.cloud NV portal, check the DNS documentation.
When using a custom virtual firewall, you will also need to configure your virtual firewall.
Configuring virtual firewall
- Select an image from the list of images for your virtual firewall. These images can be from a virtual machine or a CDROM.
- To control the type of images listed, you can use the check boxes next to Virtual machine and CDROM.
- Set the Disk size (GiB, default 10), Memory (MiB, default 128) and vCPUs (default 1) in the Custom firewall configuration section. The image table shows Name, OS type, Image type, Boot disk size, Memory and Id.
-
Click Create Cloudspace.
-
Creation runs as a background task, shown as a progress toast named Create Cloudspace (
) . When it completes, a message saying Cloudspace created successfully! should appear and you will be redirected to a page with your new cloudspace information. This can take a while.
Editing Cloudspaces
Each cloudspace has a details page, where you can access and edit all the cloudspace information.
Accessing Details Page
To access the details page for a specific cloudspace
- On the left side of the page in the navigation drawer, click Cloudspaces. The previously created Cloudspaces will be listed.
- Select the cloudspace you want to access.
A details page will appear with all the cloudspace information. Its Details panel shows the Name, Status, Location, Default External IP, Subnet, Local domain, Type and Default gateway. The action bar has DISABLE CLOUDSPACE, DELETE CLOUDSPACE, CREATE VM and MORE. The tabs are VMs, Ingress, DNS, WireGuard VPNs and External networks; the MORE menu holds Connected Cloudspaces, Objectspaces, Port forwards, Anti-affinity groups, Network Routes, Nested Cloudspaces, Roles & permissions, Audits and Connected VMs.
Renaming a Cloudspace
To rename a cloudspace, navigate to the details page. Under Name, click to edit the Cloudspace name.
Editing the Local Domain
Under Local domain, click the pencil icon to edit it in place.
Editing the Default Gateway
The Default Gateway is editable for private cloudspaces — this is how you make a custom VFW the gateway for the cloudspace. For public and nested cloudspaces, the Default Gateway is read-only.
Disabling a Cloudspace
To disable a cloudspace
- Navigate to the details page. At the top of the page, click DISABLE CLOUDSPACE.
- A Box will appear prompting you to enter the reason for disabling the cloudspace. The reason is mandatory: Confirm stays disabled until you enter one. Enter your reason and click Confirm.
Note that disabling a cloudspace stops all virtual machines inside it and stops its virtual firewall.
Result: The cloudspace and all its virtual machines and virtual firewall will be disabled.
Enabling/Resuming a Cloudspace
When a cloudspace is DISABLED, the status reads DISABLED and an ENABLE CLOUDSPACE button appears at the top of the details page. Clicking it prompts you to enter a reason for enabling the cloudspace; enter your reason and click Confirm to bring the cloudspace (and its virtual machines and virtual firewall) back up; the status returns to DEPLOYED.
Deleting a Cloudspace
To delete a cloudspace
- Navigate to the details page. At the top of the page, click DELETE CLOUDSPACE.
- A Box will appear prompting you to enter the reason for deleting the cloudspace. The reason is mandatory: Confirm stays disabled until you enter one. Enter your reason and click Confirm.
Note that in order to delete a cloudspace, it must not contain machines; otherwise the portal answers "In order to delete a CloudSpace it can not contain Machines." To delete several cloudspaces at once, tick their rows in the Cloudspaces list and click DELETE SELECTED CLOUDSPACES. The deleted cloudspaces will be moved to the recycle bin for a retention period (default 7 days) set by your operator, then they will be permanently deleted.
Managing Port Forwards
Note
Port forwards aren't supported for private cloudspaces — they require an external network to forward from.
Creating a Port Forward
You can create port forwards for a cloudspace from the cloudspace details page.
To create a port forward
- Select Port forwards from the MORE menu to manage port forwarding, where a list of the existing port forwards will appear.
- At the top of the page, click CREATE PORT FORWARD.
- Fill in the form with the port forward information and click Create. The target can be a virtual machine or a nested cloudspace.
Tip
While creating a new port forward, you can configure forwarding for a range of ports by specifying start and end ports for your new port forward.
Result: Your new port forward will be added to the list of port forwards for the specific cloudspace, showing its ID, external virtual firewall IP and port, target resource name and type, resource port, and protocol.
Updating a Port Forward
You can update a specific port forward from the cloudspace details page. Similarly to creating a port forward, to update a port forward
- Select Port forwards from the MORE menu, where a list of the existing port forwards in this cloudspace will appear.
- Click the port forward you want to update. A form will appear where you can update the port forward fields.
- Click UPDATE.
Result: A message indicating that the port forward was successfully updated will appear.
Deleting a Port Forward
To delete a port forward, click the delete icon on its row in the list and confirm in the Delete port forward dialog ("Please confirm deleting port forward with id ..."). No reason is required.
Result: The selected port forward will be deleted.
Connecting to another Cloudspace
You can connect your cloudspace to other cloudspaces in the details page.
To connect to other cloudspaces
- Select Connected Cloudspaces from the MORE menu.
- At the top of the page, click CONNECT TO REMOTE CLOUDSPACE.
- On the Select remote cloudspace step, choose the target cloudspace from the list and click Next.
- On the Select IP address endpoints step, choose a Local IP address and a Remote IP address.
- Click Connect cloudspace.
To disconnect, use the Disconnect icon on the connection's row and confirm.
Note that connected cloudspaces are not supported for private cloudspaces. Also, to connect two cloudspaces, they must not have overlapping private networks.
External Networks
Adding an external network provides an interface to the virtual firewall of your cloudspace inside the target external network. This can be a cloudspace or an external network attached to the location. (For example "The internet". Available external networks depend on the location)
Each external network has a type, metric (optional), target network and IP address (optional).
Adding an External Network
You can create a new External Network in your cloudspace from the cloudspace details page.
- Select EXTERNAL NETWORKS from the given tabs in the middle of the page.
- Click ADD EXTERNAL NETWORK at the top of the page.
- Configure the external network by entering the values of the external network's type (whether external or cloudspace), metric, target network and IP address.
- Click ADD EXTERNAL NETWORK.
Tip
For the metric, the lowest value has the highest priority.
Deleting an External Network
To delete an external network:
- Navigate to the cloudspace details page and select EXTERNAL NETWORKS from the given tabs.
- Select the specific external network you want to delete.
- At the top of the page, click REMOVE EXTERNAL NETWORK.
Network Routes
Network routing is the process of selecting a path across one or more networks. The routing process usually directs forwarding based on routing tables. Routing tables maintain a record of the routes to various network destinations.
For example, if we have Host X and Host Y with R1 Router
- Host X with IP 11.11.11.5 wants to communicate with Host Y with IP 22.22.22.3, but Host Y is on another remote network.
- Host X is configured to send all packets destined for remote networks to the Router R1.
- The Router R1 receives the packets, checks the routing table to see if it has an entry for the destination address 22.22.22.3 .
- If it does, the Router R1 forwards the packet to the appropriate interface port.
- If the Router R1 doesn’t find the entry, it discards the packet.
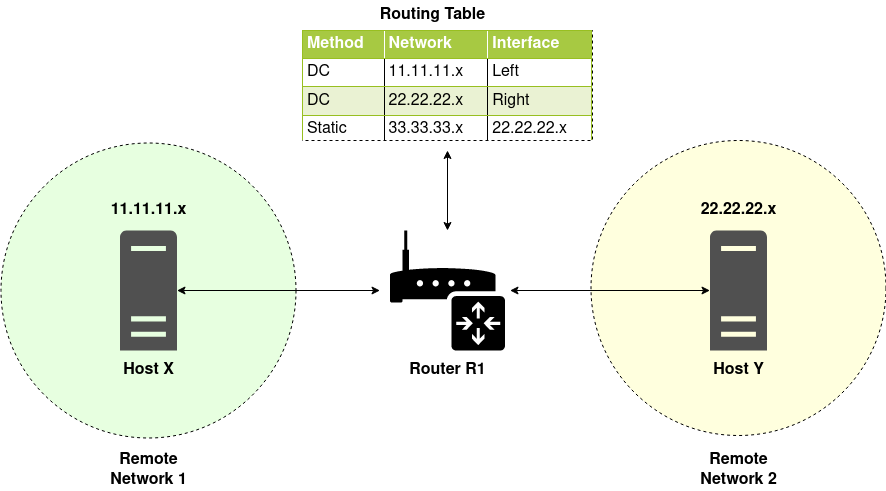
Tip
Routes that are DC (Directly Connected) don't need to be configured. However, static routes are manually configured by an administrator.
Tip
Configuring routing rules requires knowledge about IP routing. For more information check this routing tables wiki page.
Adding a Network Route
You can create a new Network Route in your cloudspace from the cloudspace details page.
- Select Network Routes from the More dropdown menu.
- Click ADD NETWORK ROUTE at the top of the page.
- Configure the network route by entering the values of the network route's destination network to route, gateway to route the destination over, network route metric (optional, default 500) and routing table to store the route in (leave it empty to store it in the default table).
- Click ADD NETWORK ROUTE.
Tip
For the metric, the lowest value has the highest priority.
Note
The portal rejects the route with "Gateway is not reachable by any network" when the gateway is not on one of the cloudspace's networks (for example, use the private IP of a VM in the cloudspace).
Deleting a Network Route
To delete a network route:
- Navigate to the cloudspace details page and select Network Routes from the More dropdown menu.
- Select the specific network route you want to delete.
- At the top of the page, click REMOVE NETWORK ROUTES.
Managing Anti-Affinity Groups
Anti-affinity group places a group of VMs across different hosts, which prevents all VMs from failing at once if a single host fails.
Creating an Anti-Affinity Group
You can create anti-affinity groups for the VMs in a cloudspace from the cloudspace details page.
To create an anti-affinity group
- Select Anti-affinity groups from the MORE menu. A list of the existing groups in this cloudspace will appear.
- At the top of the page, click CREATE ANTI-AFFINITY GROUP.
- Enter a label for the group and specify the spreading value (you can choose infinite spreading), then click Create.
Result: Your new group will be added to the list of anti-affinity groups for the specific cloudspace, with the status INCOMPLETE until virtual machines are added to it.
Adding/Removing Machines
To add/remove virtual machines in an anti-affinity group:
-
Navigate to the cloudspace details page and select Anti-affinity groups from the MORE menu.
-
Select the specific anti-affinity group you want to edit.
To add virtual machines to the group
- click ADD VIRTUAL MACHINE at the top of the page.
- Choose the virtual machine you want to add and click Add. The virtual machine will be added to the group.
To remove a virtual machine from the group
- In the list of virtual machines inside the group, click under Actions.
- A message will appear making sure that you want to remove the virtual machine from the group, click Confirm. The virtual machine will be removed from the group.
Deleting an Anti-Affinity Group
To delete an anti-affinity group
- Navigate to the cloudspace details page and select Anti-affinity groups from the MORE menu.
- Select the specific anti-affinity group you want to delete.
- At the top of the page, click DELETE.
Result: The anti-affinity group will be deleted and removed from the list of groups.
Audits
Audits provide a list of all the requests made related to the cloudspace. You can check the date and time of the request, the method used, the path of the request, the user who made the request, the status and response time.
To see your request list, select Audits from the More dropdown menu. You can filter the request list by Path, User and Status. Also, you can include the GET requests in the results by clicking include GET request above the results.
If you clicked on the request date and time, you will be redirected to the details page of this specific request. The request details page covers all the request information and the JSON format of both request and response.
Cloudspace Notes
On the cloudspace details page, you can add private notes (visible only to you) using the notes icon in the resource details panel.
Connected VMs
The cloudspace MORE menu has a Connected VMs page that shows VMs from connected (peer) cloudspaces, with their IP addresses. Useful for cross-cloudspace visibility.
Objectspaces
The cloudspace MORE menu has an Objectspaces page listing the objectspaces connected to this cloudspace.
Storage-Only Cloudspaces
Cloudspaces that contain only objectspaces (no VMs) show a reduced set of tabs — the VMs, Connected VMs, and Anti-affinity tabs are hidden.
Updating an External Network Metric
On the cloudspace's External Networks tab, each IP address is a link to an edit page where you can change the metric value. The type, IP, and network are read-only.