Deploy S3 via the Portal
Objectspace is an object storage exported via the commonly used S3 protocol. Objectspaces allow you to store large amounts of unstructured blobs of data ( images, videos, text files, HTML files..) or any blob of bytes.
An objectspace can be connected to one or more cloudspaces. However, cloudspaces with overlapping networks cannot connect to the same objectspace.
You can manage your buckets (create/delete/edit) in an objectspace using a client compatible with S3 such as MinIO or from the whitesky.cloud NV user interface.
To access your S3 content, you can use the MinIO Client which offers UNIX like commands to manage buckets and objects. Next to MinIO there are tons of other clients and applications that support the S3 protocol.
In this tutorial, we will create an objectspace and make it publicly accessible using Ingress, then we will connect to our objectspace using MinIO client.
Tip
Using the DNS feature provided on the whitesky.cloud NV portal, you can simply create a publicly accessible S3 storage in less steps. However, this tutorial can help you understand how you can use reverse proxies and connect to your S3 storage using MinIO client.
Tip
To learn more about how you can use DNS on the whitesky.cloud NV portal, check the DNS Documentation.
Step 1 : Create an objectspace
- Click Objectspaces on the left side of the whitesky.cloud NV portal. The previously created objectspaces will be listed.
- Click CREATE OBJECTSPACE at the top of the page.
-
Select the location where you want to create your objectspace.
Tip
Keep in mind that objectspaces can only connect to cloudspaces in the same location.
-
Enter your Objectspace Name, we will use the name MinIO Objectspace for this tutorial. (Optionally: choose the cloudspace to connect to, but it is recommended to choose the cloudspace in this step.)
- Click CREATE OBJECTSPACE.
Step 2 : Connect to cloudspace (Optional: If you didn't connect your Objectspace to a Cloudspace in Step 1)
You need to have a public cloudspace to connect it with our objectspace. If you don't know how to create a public cloudspace, check the Cloudspace documentation and create a cloudspace named MinIO Cloudspace for this tutorial.
-
Click Objectspaces on the left side of the page. The previously created Objectspaces will be listed.
-
Click on the objectspace that you want to connect with your cloudspace.
-
At the top of the page, click CONNECT. A list of available cloudspaces will appear.
-
Choose the cloudspace from the list, then click CONNECT again to confirm.
A message will appear indicating that the objectspace has been successfully connected to the cloudspace.
Step 3 : Expose objectspace using ingress
-
Open the details page of your cloudspace that is connected with your objectspace, and click Ingress in the middle of the page.
-
Click Create Server Pool at the top of the page and enter your Name and Description (optional), then click Add.
-
After being redirected to the server pool details page, click Add Host at the top of the page.
-
Select an objectspace, then choose your objectspace from the objectspaces list and click Add.
Next we need to add a reverse proxy to our serverpool within our cloudspace
-
Open the cloudspace details page and click Ingress in the middle of the page, then in the sub-menu click Reverse Proxy.
-
Click Create Reverse Proxy at the top of the cloudspace details page.
-
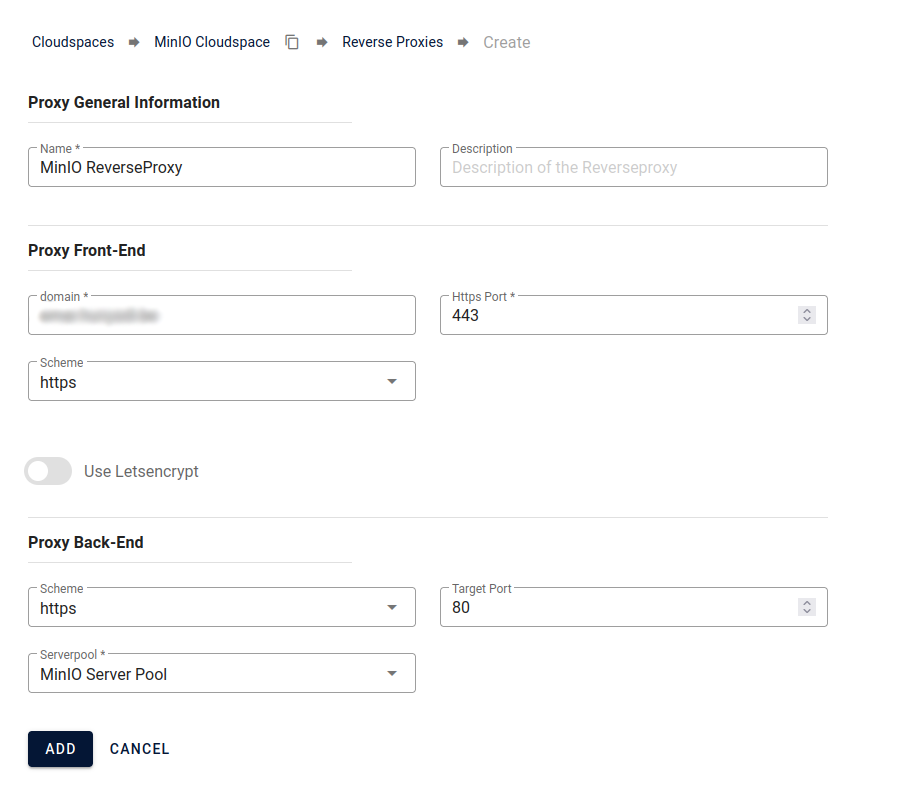
Configure your proxy general information:
- Name
- Description (Optional)
- Locked (Optional) — prevents accidental edits/deletion
- Domain that you will use in your Proxy Front-end (e.g mydomain.example.be)
- Scheme whether HTTP or HTTPs or both.
- IP address to bind the front-end to, and the Http Port/Https Port (e.g. 443)
- Use Letsencrypt (Letsencrypt), if using HTTPS.
- backend scheme.
- Serverpool
- Target Port (e.g 80)
Tip
You must configure the domain that you added to point to the same external IP of the cloudspace to be able to initialize the connection.
-
Click Add, then the reverse proxy will be added to the reverse proxy list on the cloudspace details page.
Your objectspace is now accessible publicly from inside or outside your cloudspace.
Tip
You can use whether CLI or APIs to create your objectspace and connect it with a cloudspace that has a reverse proxy.
Step 4 : Accessing your objectspace
Once your objectspace is set up, see Accessing S3 via the MinIO Client to manage its buckets and objects — from a VM inside your cloudspace, from your own machine, or by sharing upload links with external services.