Linux Cloud-Init Images
In this tutorial, we are going to introduce cloud-init and how you can use it to customize Linux images for deployment.
What is Cloud-init ?
"Cloud-init is the industry standard multi-distribution method for cross-platform cloud instance initialization. It is supported across all major public cloud providers, provisioning systems for private cloud infrastructure and bare-metal installations."
In other words, cloud-init can help you automatically set up your Linux deployment images and ensures that a group of tasks is automatically done every time you deploy a new Linux server from that image. For example, automatically creating users, installing packages, resetting SSH keys, and more.
Tip
For Windows images, you can check cloudbase which is the Windows equivalent to Cloud-init.
You can check the cloud-init documentation to learn how to get started with cloud-init.
Cloud-init supported distributions
Cloud-init supports multiple distributions and clouds, both public and private.
It's also supports all major Linux distributions, FreeBSD, NetBSD, OpenBSD and DragonFlyBSD:
- Alpine Linux
- Debian
- Fedora
- FreeBSD
- Gentoo Linux
- NetBSD
- OpenBSD
- RHEL/CentOS/AlmaLinux/Rocky Linux/EuroLinux
- Ubuntu
You can check the full list of available distributions and clouds on cloud-init documentation.
Cloud-init configuration
Cloud-init builds a single configuration. This configuration is built from multiple sources with different priorities. According to Cloud-init documentation, the higher-priority source overwrites the lower-priority source.
Configuration sources priorities
The following sources are organized from the lowest priority to the highest priority:
| Configuration sources | Description |
|---|---|
| Hardcoded config | Config that lives within the source of cloud-init and cannot be changed. |
| Configuration directory | Anything defined in /etc/cloud/cloud.cfg and /etc/cloud/cloud.cfg.d. |
| Runtime config | Anything defined in /run/cloud-init/cloud.cfg. |
| Kernel command line | On the kernel command line, anything found between cc: and end_cc will be interpreted as cloud-config user data. |
Vendor and User Data
Added to the previous configuration are:
Both of them get fetched from the datasource and are defined at instance launch.
Tip
Much of what is defined in the base configuration can be overridden by vendor data and user data.
Datasources
A datasource is how cloud-init discovers its configuration at boot — instance metadata, network config, and user data. whitesky.cloud NV exposes an EC2-compatible metadata endpoint, so your image should be configured to use the Ec2 datasource.
How whitesky.cloud NV provides the datasource
When a VM boots on whitesky.cloud NV, the platform serves metadata at the standard EC2 link-local address:
- Metadata endpoint:
http://169.254.169.254:80 - Fallback endpoint:
http://instance-data:8773(for environments where the link-local route is not available)
Cloud-init queries this endpoint for instance identity, network configuration, and any user data you passed at VM creation (via the portal's SSH key field or the API's userdata payload).
Configuring your image for the whitesky.cloud NV datasource
Your image's cloud-init configuration must tell cloud-init to use the Ec2 datasource. Two files are required:
1. /etc/cloud/cloud.cfg — set the datasource and metadata URLs:
ssh_pwauth: true
manage_resolv_conf: false

datasource_list: [ Ec2 ]
datasource:
    Ec2:
        metadata_urls: ["http://169.254.169.254:80", "http://instance-data:8773"]
        max_wait: 120
        timeout: 50
        apply_full_imds_network_config: true
2. /etc/cloud/ds-identify.cfg — control how cloud-init identifies the datasource at boot:
This policy tells cloud-init to search for a datasource, accept it if found, and disable cloud-init if none is found (so the VM doesn't hang waiting for metadata).
What cloud-init receives from whitesky.cloud NV
Once the datasource is active, cloud-init can use:
- Instance metadata — hostname, instance ID, local/public IP addresses
- Network configuration — NICs, IPs, routes (applied via
apply_full_imds_network_config: true) - User data — any cloud-config you passed at VM creation (e.g. creating users, installing packages, running scripts). In the portal, the SSH key field is injected as user data. Via the API, use the
userdatafield in the create-VM payload.
Tip
If you're building a custom image, make sure the four cloud-init services are enabled (cloud-init-local, cloud-init, cloud-init-config, cloud-init-final) and that the resolv_conf module is in the cloud_init_modules list in cloud.cfg. See the Configure Cloud-init on CentOS 7 section below for the full setup.
For the full list of cloud-init datasources and their configuration options, see the cloud-init documentation.
Cloud config example
Check the cloud configuration examples provided on Cloud-init official documentation.
Configure a Linux-based image with Cloud-init and upload it to the whitesky.cloud NV portal
Let's assume that we have a local Linux-based image that we want to upload and use on the whitesky.cloud NV portal.
In the following step-by-step guide, we will illustrate how you can set up a Linux-based image locally. Then, we will configure this image using cloud-init to be compatible and ready to be uploaded to the whitesky.cloud NV portal.
As an example, we will use CentOS 7 for this tutorial.
Create CentOS 7 image locally
Prerequisites
- CentOS image from CentOS official website. In our case, we will use the CentOS-7-x86_64-NetInstall-2009.iso.
- Linux-based host.
- Install Virtual machine manager on your machine. Virtual machine manager allows you to view and manage your VMs using a simple GUI.
Note: You can use any prefered alternative for virtual machine manager to create and manage VMs.
If you faced the error of [ unable to connect to libvirt qemu:///system ] on the virtual machine manager.
1. Try to restart the VM.2. If the error is still there then use the following commands:
sudo apt install qemu qemu-kvm libvirt-clients libvirt-daemon-system virtinst bridge-utils
sudo systemctl enable libvirtd
sudo systemctl start libvirtd
Now, everything is ready to start the configuration wizard of our CentOS 7 image.
-
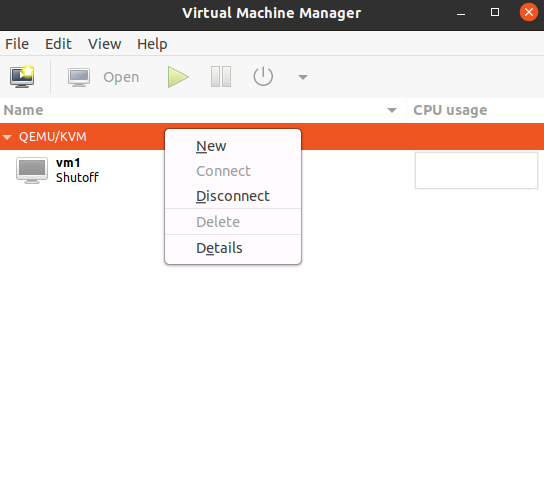
Open the virtual machine manager. Then, right-click on QEMU/KVM and click New.
-
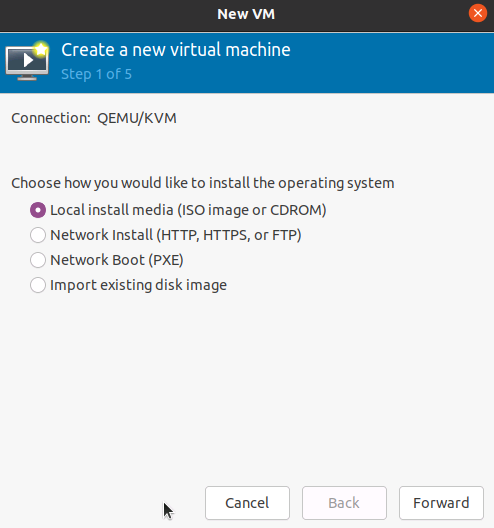
Select Local install media (ISO image or CDROM). Then, click Forward.
-
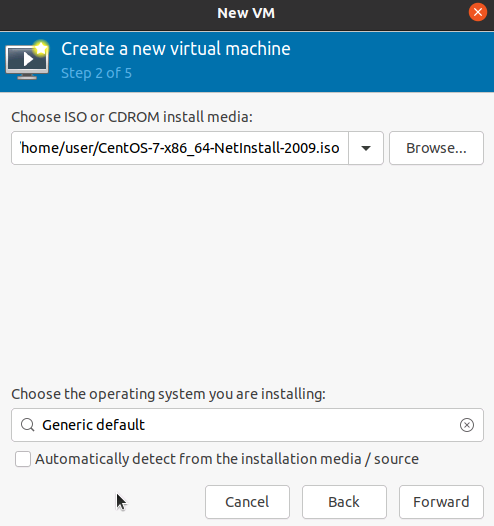
Click Browse to choose the ISO source and select the new CentOS ISO that you previously downloaded. Then, click Choose Volume.
-
Uncheck Automatically detect from the installation media/source and select Generic default or directly choose the OS version that you are trying to install. Then, click Forward.
-
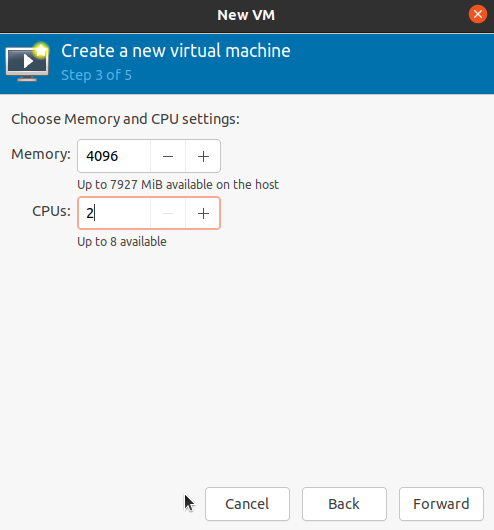
Choose the size of Memory and CPUs. Then, click Forward.
-
Create a disk image for your VM and click Forward.
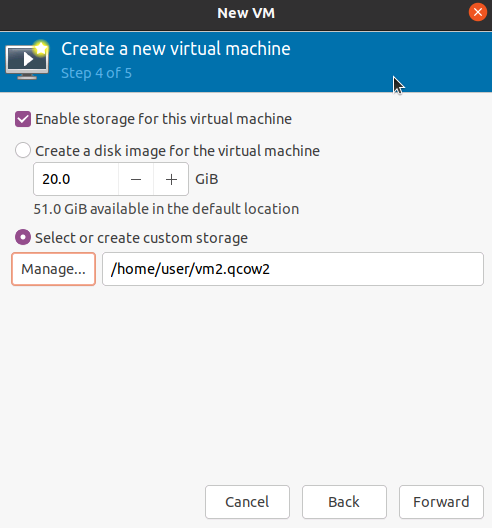
- Option 1: Virtual manager will create the disk image for you and just select the disk size.
- Option 2: Create custom storage and choose its directory.
- Click Manage.
- Choose the directory where the disk will be created.
- Click and enter the disk name, maximum capacity and leave the format to be qcow2. Then, click Finish.
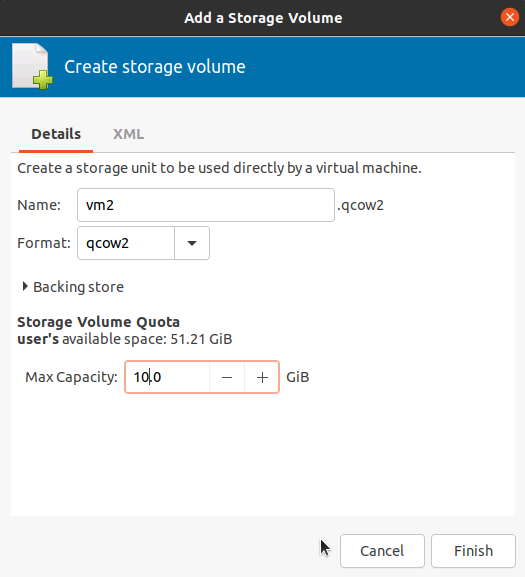
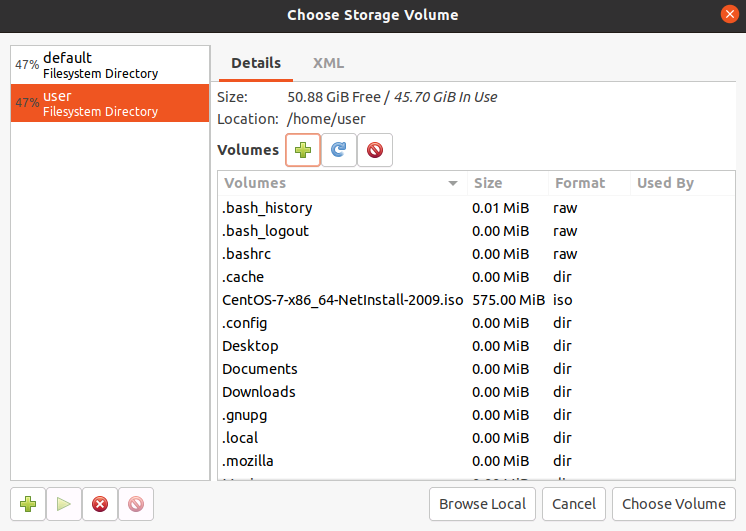
- Choose the newly created disk and click Choose Volume.
- Enter the name of the VM and click Finish.
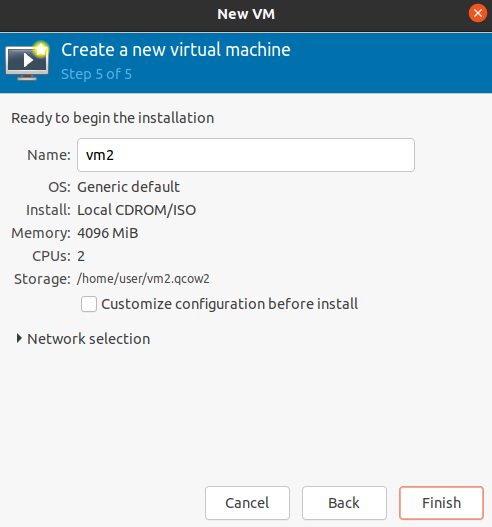
-
The newly created VM will start automatically and you can see the CentOS 7 installation wizard.
Installing CentOS 7 on QEMU/KVM
-
Select Install CentOS Linux 7.
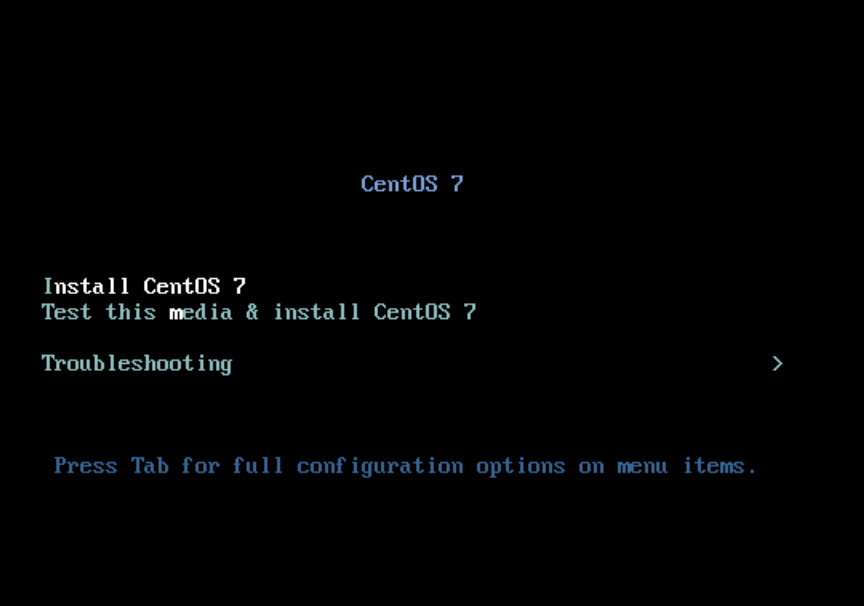
-
Select your installation language and click Continue.
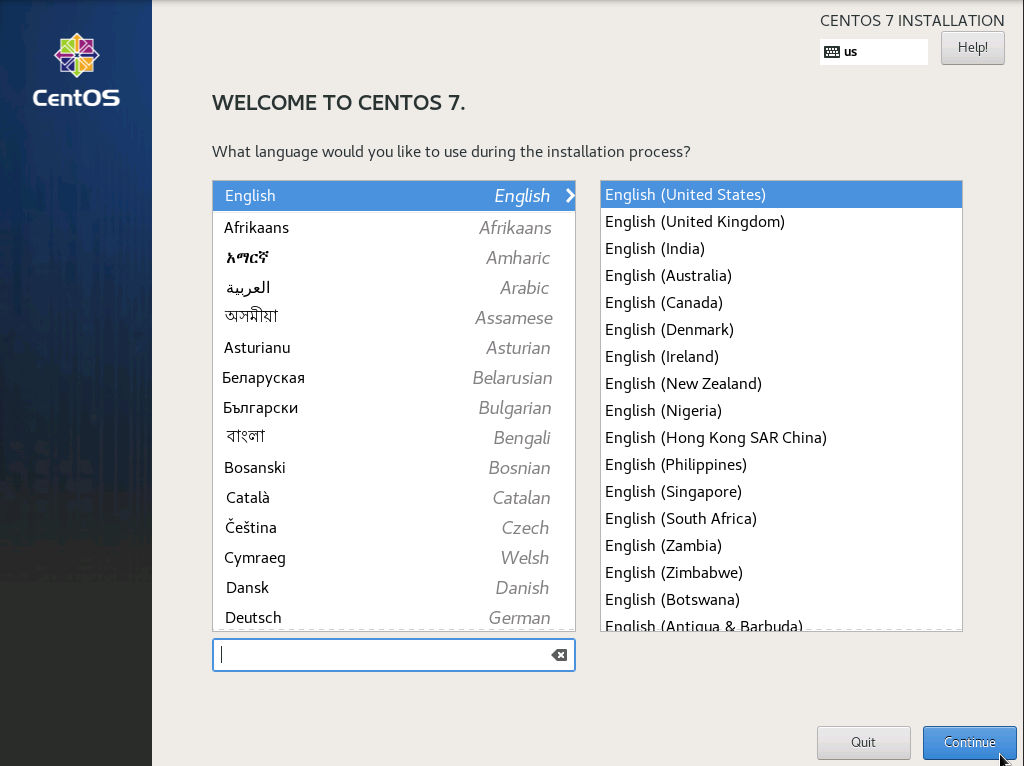
-
Select the Installation Destination
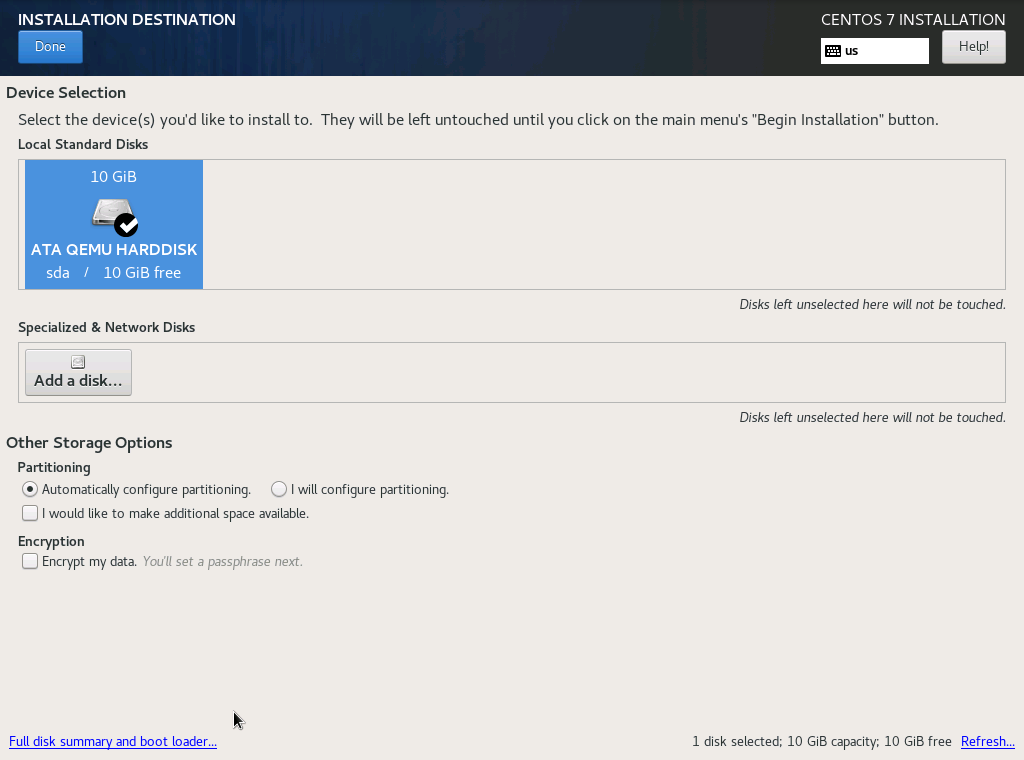
- Select the virtual harddrive.
- Under Storage Configuration, check the Automatic option.
- Click Done.
-
Select Network & Host Name
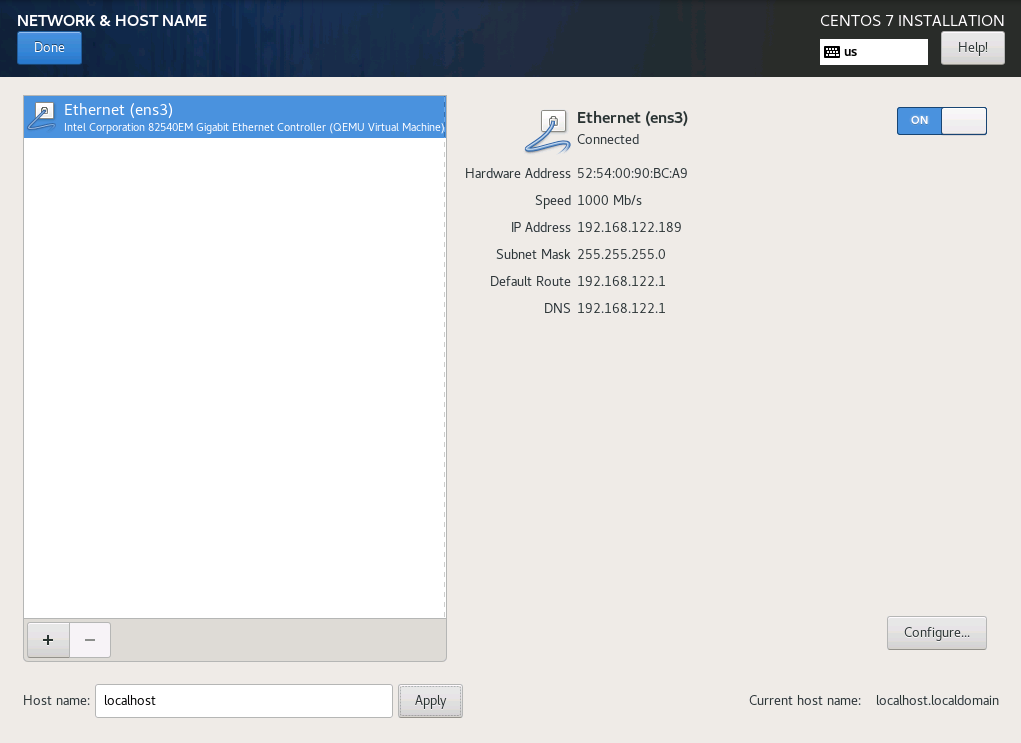
- Enter the Host Name (e.g localhost) and click Apply.
- Enable the Ethernet toggle to activate the network adapter. Once it's activated click Done.
Tip
Sometimes Installation Source could display an
Error setting up base repository. After setting up the network, open the Installation Source and in the URL enter the CentOS Mirror URLhttp://mirror.centos.org/centos/7/os/x86_64/. -
Select Software Selection
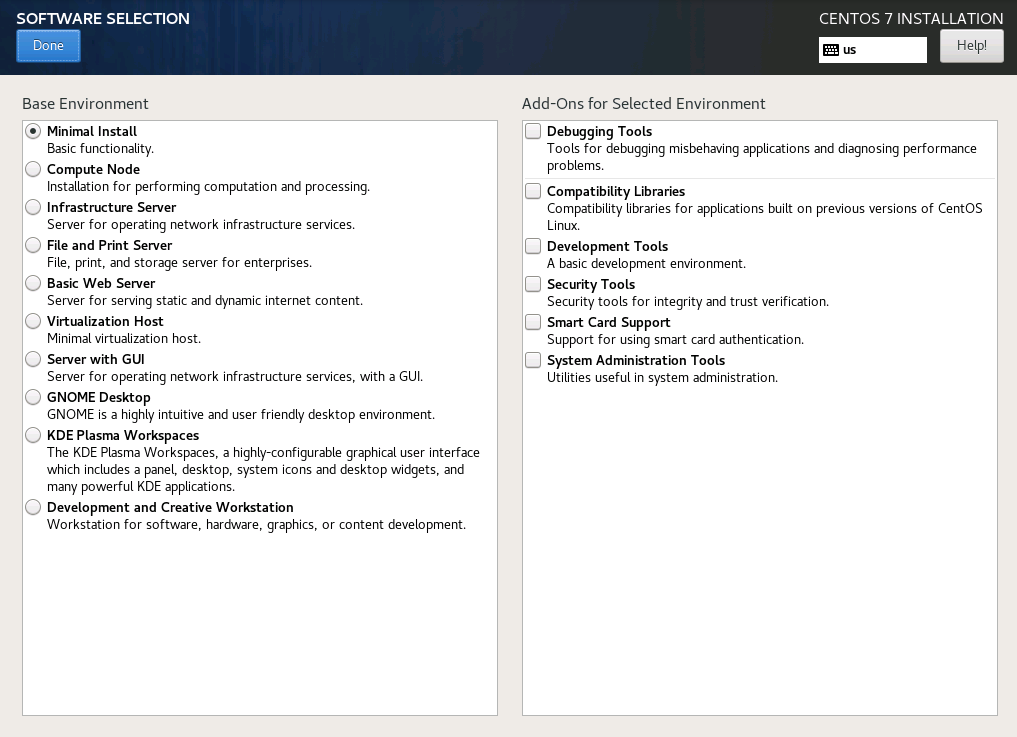
- Choose the desired base environment and decide if you want to add any Add-Ons to that environment.
- Click Done.
-
Click Begin Installation.
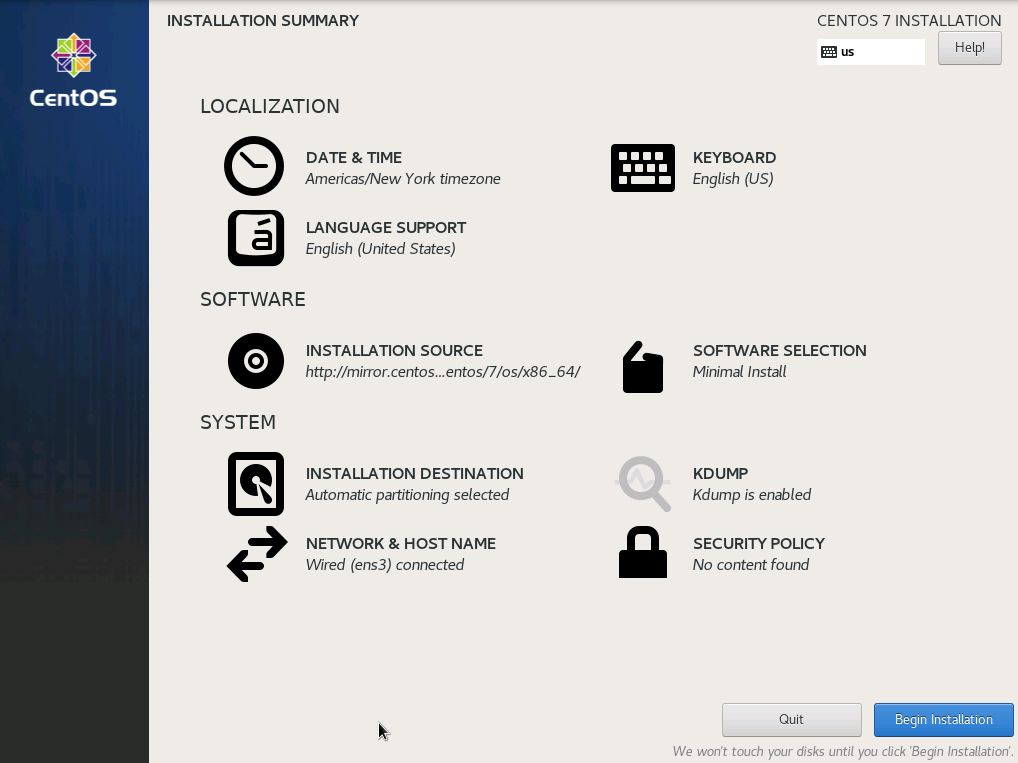
-
Create a new user for your OS.
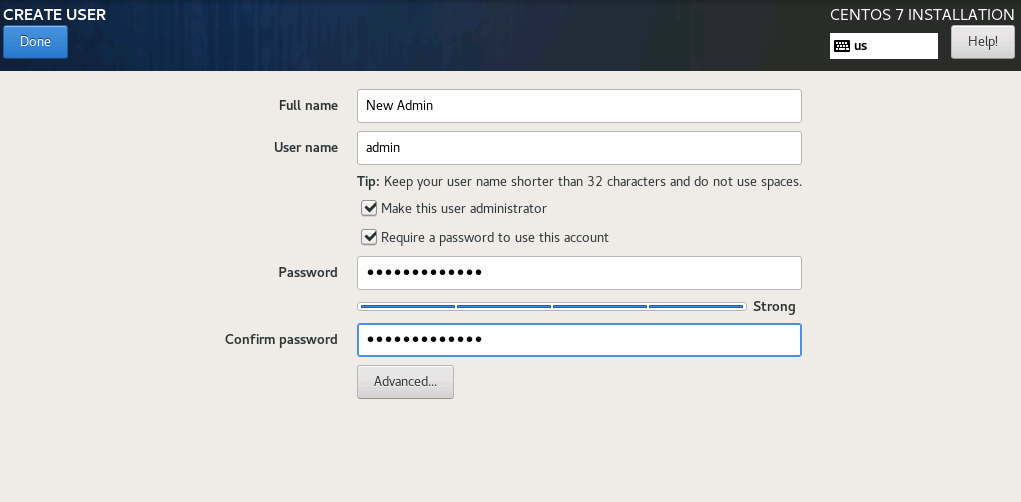
- For User Creation
- Enter your Full name, User name, Password and Confirm Password.
- Check the Make this user administrator option.
- For Root Password
- This is optional if you already chose to check the Make this user administrator option while creating your new user.
- If you didn't make your user an administrator, then you can set a root password.
- For User Creation
-
Once the installation is finished successfully, click Reboot.
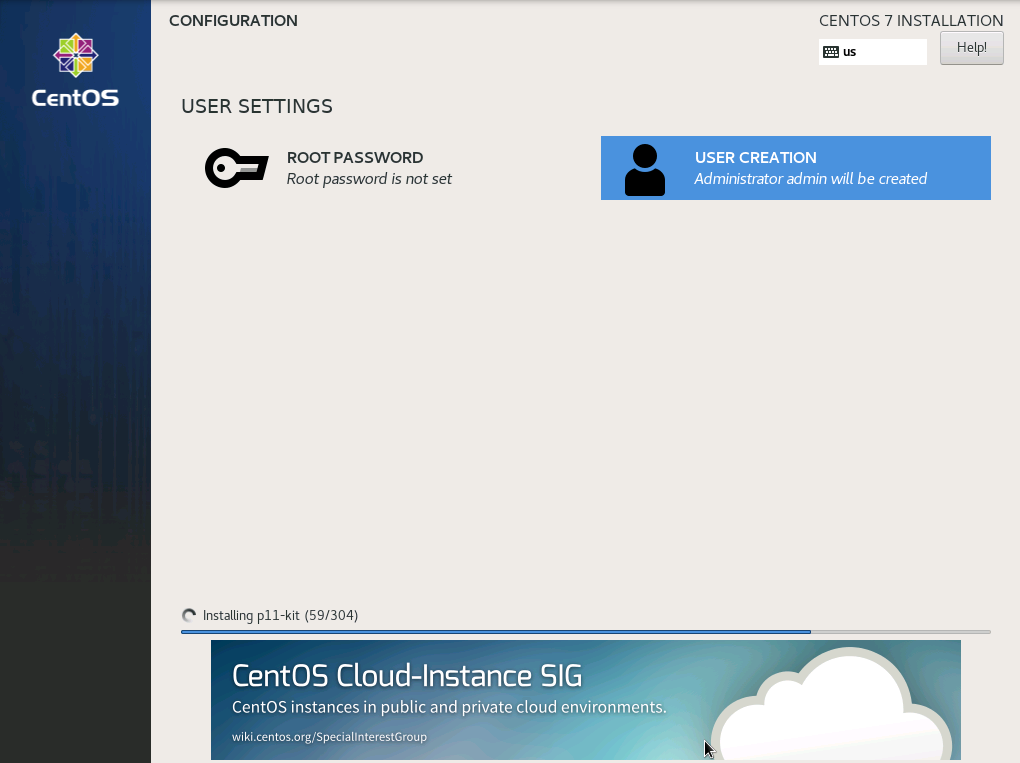
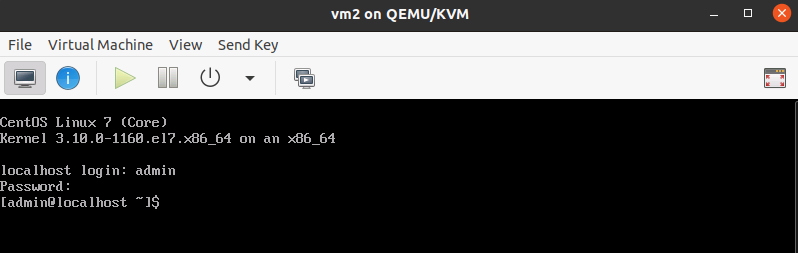
After rebooting the machine, you can log in using the username and password that you set before.
Configure Cloud-init on CentOS 7
Prerequisites
- Make sure that cloud-init isn't installed on your image using the following command:
- A Text editor of your choice. For this tutorial, we will use Vim editor and you can install it using the following command:
Now we can start installing/configuring Cloud-init on our CentOS 7 image.
- Install cloud-init and its dependencies on your image using the following command.
- Test the installation using the following command
- Now cloud-init is installed but most probably it will be
disabled, you can check the cloud-init status using the following command - Access the following file
/etc/cloud/cloud.cfgwith vim using the following command -
Add the following data to
cloud.cfgssh_pwauth: true manage_resolv_conf: false datasource_list: [ Ec2 ] datasource: Ec2: metadata_urls: ["http://169.254.169.254:80", "http://instance-data:8773"] max_wait: 120 timeout: 50 apply_full_imds_network_config: true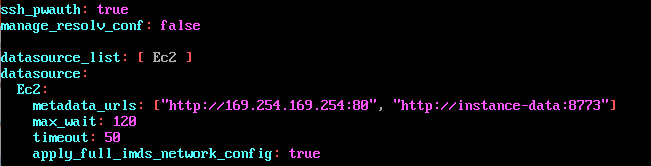
Tip
We used Ec2 as a datasource since whitesky.cloud NV portal is compatible with updating Ec2. To make it simple, we will just use the default values for Ec2 datasource. Check cloud-init documentation to see other datasources and examples of how you can configure each of them.
-
Add
resolv_confmodule in thecloud_init_modulessection afterupdate_etc_hostsmodule.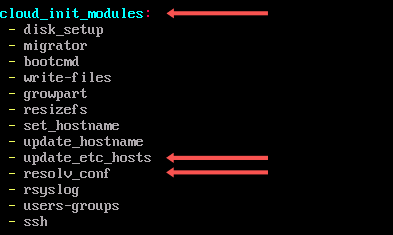
-
Save the changes that you made on
cloud.cfgby pressing ESC then type:wq! - Enable and start the cloud-init related services by running the following commands separately
sudo systemctl enable cloud-init-local.service sudo systemctl enable cloud-init.service sudo systemctl enable cloud-config.service sudo systemctl enable cloud-final.service sudo systemctl start cloud-init.service sudo systemctl start cloud-init-local.service sudo systemctl start cloud-config.service sudo systemctl start cloud-final.service - Create a new file /etc/cloud/ds-identify.cfg and add the following data.
- Update the NetworkManager package to the latest version provided by RedHat.
- Now cloud-init is configured and the status should be changed to
done, you can check the cloud-init status using the following command
Uploading your image to whitesky.cloud NV portal
Note: You will need to upload your image to an HTTP server to make it accessible through a URL that will be used next in the image uploading to whitesky.cloud NV portal.
- Open your whitesky.cloud NV portal, click Locations in the left menu.
- Choose the desired location to upload your image.
- Click ADD VIRTUAL MACHINE IMAGE at the top bar.
- Enter your cloud image information:
- Name - Cloud image name.
- URL - Link of the image that you uploaded to an HTTP server before.
- Boot type - Boot type of your image.
- OS type - Type of the operating system of your image.
- OS name - Name of the operating system of your image.
- Memory size - Memory size needed by the image to operate.
- Boot disk size - Boot disk size needed by the image to operate.
- Click ADD VIRTUAL MACHINE IMAGE.
Wait until the upload process is finished, then check the VM images on your location and you can find your new VM image with status: CREATED and it is now ready to use.
Testing your new cloud image
- Open your cloudspace that is created in the same location as your cloud image.
- Click CREATE VM at the top of the page.
- Select Create from an image option.
- A list of images will appear, select your newly uploaded cloud image.
- Configure the sizes of:
- vCPUs
- Memory
- Boot disk
- Add configuration details for your VM:
- Name
- Description (optional)
- Private IP (optional)
- SSH key (optional, for Linux based OSs).
- Click CREATE.
- Open the VM using console at the top of the page.
- If cloud-init is configured correctly, you will be allowed to log in using:
- whitesky.cloud NV provided credentials which you can find on the VM details page.
- The initial credentials that you configured on your image locally.
- Test that the cloud-init status is set to be
doneusing the following command.

Create a new VM with API and add a new user using Cloud-init
We can create a new VM on whitesky.cloud NV using APIs. Additionally, we can configure our userdata as a payload to create a new user using cloud-init.
-
Use the following POST request to create a VM on the whitesky.cloud NV portal.
-
Add the parameters to configure the VM.
-
Use cloud-init configuration in your request payload to create a simple user.
-
Open your newly created VM on the whitesky.cloud NV portal and log in with your new user credentials.

To learn more about using APIs on the whitesky.cloud NV portal check try.whitesky.cloud/api/1. You can find more cloud-init configurations on Cloud-init documentation.